
Testa Wetail Shipping riskfritt!
Modern frakttjänst. Designad för WooCommerce.
Setup guide – WooCommerce Stripe Subscriptions
This guide walks through installing and configuring the plugin step by step. It is written for store admins and technicians, including those with limited technical background.
Before you start, make sure you have a valid licens for Stripe Subscriptions for WooCommerce.
Requirements
- WordPress with WooCommerce active
- PHP 8.1+ with cURL, JSON, and mbstring
- HTTPS (required for production / webhooks)
- Stripe account with Test and/or Live API keys
Table of content
- Install and activate the plugin
- Add your licens key
- Connect you Stripe API keys
- Enable the payment gateway
- Confirm webhooks are active
- Setup subscription frequencies
- Review tax mappings
- Review shipping methods
- Customer experience settings
- Related guides
- Run test purchase
- Go live checklist
- Troubleshooting
1. Install and activate the plugin
- In WordPress admin, go to Plugins → Add New.
- Upload or install Stripe Subscriptions for WooCommerce.
- Click Activate.
WooCommerce must already be active. The plugin depends on it.
2. Add your licens key
Go to WooCommerce → Settings → Stripe Subscriptions
And add your license key that you have received by email from us.

Once pasted in the field, click Save and check
3. Connect your Stripe API keys
Go to WooCommerce → Settings → Wetail Stripe Subscriptions → General
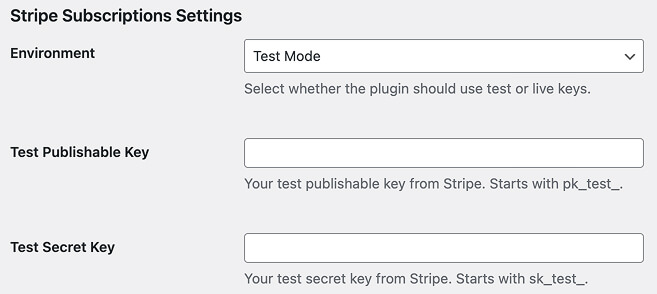
Run test environment
Open an other tab in your browser and copy your API-keys in Stripe Dashboard → Developers → API keys
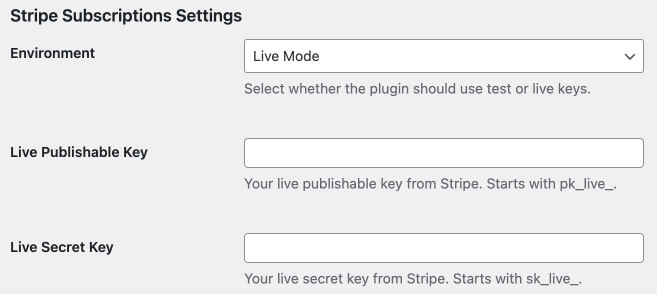
Run Live environment
Copy your keys in Stripe Dashboard → Developers → API keys
Click Save changes at the bottom of the section
The plugin validates the secret key against Stripe. Fix any admin notices before continuing.
When you are ready for real payments, switch Environment to Live Mode and add your pk_live_ / sk_live_ keys the same way.
4. Enable the payment gateway
- Go to WooCommerce → Settings → Payments.
- Enable Stripe Subscriptions.
- Optionally set the checkout title and description customers see.
- Save.
API keys are managed under Stripe Subscriptions settings, not inside the payment method screen.
5. Confirm webhooks are active
Webhooks are created automatically when settings are saved.
- Go to WooCommerce → Settings → Stripe Subscriptions → Orders.
- Confirm a Test environment Webhook ID (or Live ID in live mode) is shown.
- Keep Create Renewal Orders in WooCommerce enabled if you need packing/shipping orders for renewals. For pure virtual products you may disable it.
If the webhook ID is empty, re-save General settings and check that your site is publicly reachable over HTTPS.
6. Set up subscriptions frequencies
Go to WooCommerce → Settings → Wetail Stripe Subscriptions → General
Scroll down to Subscription Frequencies and any frequencies you want to offer in your shop.
You can cherrie pick or choose all frequencies on your products and variations.
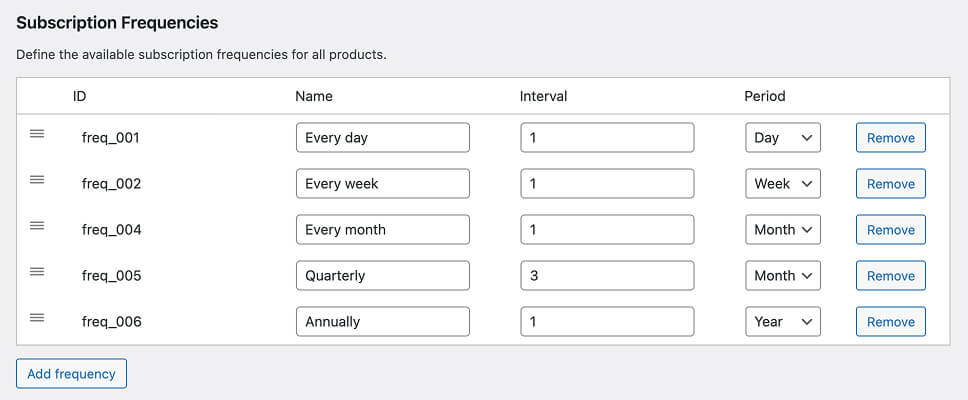
Once you are done click Save settings below this box.
7. Review tax mapping
Your store’s WooCommerce tax rates are used as the source of truth. When a customer places a subscription order, the plugin attaches matching Stripe tax rates to the subscription. If a WooCommerce tax rate has no Stripe mapping yet, the plugin creates one in Stripe automatically and stores it for future orders.
Bulk synk Tax settings (optional)

Manual tax mapping (optional)
You can also map rates manually if you prefer to control which Stripe tax rate is used:
- First create your tax rates in WooCommerce → Settings → Tax (country, rate, name, and tax class).
- Go to WooCommerce → Settings → Stripe Subscriptions → Tax Mapping.
- For each WooCommerce tax rate, leave the Stripe Tax Rate ID fields empty to let the plugin create them when needed, or enter an existing Stripe Tax Rate ID (
txr_...) from Stripe Dashboard → Tax Rates. - Map both exclusive and inclusive columns if your store may use either tax behavior.
- Click Save.
Manual mapping is useful when you already have tax rates in Stripe, or when you want a specific txr_... instead of an auto-created one. If you leave fields empty, sync still happens automatically on the first relevant order.
8. Review shipping methods (if you ship physical products)
If the cart includes shipping, the plugin adds a recurring shipping line to the Stripe subscription. When that happens, it looks up a matching Stripe shipping price for the order’s shipping total, methods, currency, tax behavior, and subscription frequency. If none exists yet, it creates the Stripe shipping product/price automatically and caches it for reuse.
Manually sync shipping options (Optional)
You can also pre-create shipping products per WooCommerce method in admin:
- Configure shipping zones and methods in WooCommerce → Settings → Shipping.
- Go to WooCommerce → Settings → Stripe Subscriptions → Shipping.
- For each method, use Create to sync a Stripe shipping product with prices for your subscription frequencies, or leave them unsynced and let the plugin create what it needs on the first relevant order.
- Use Update after changing a method’s cost, or Flush if you need to clear mappings and start over.
Admin shipping sync is useful for review and fixed-cost methods. It is not required for checkout: order-time creation still covers shipping when a subscription is placed.
9. Optional: Customer Experience settings
These settings control what subscribers can do in My Account → Subscriptions. They are not required to activate payments, but review them before launch.
Go to WooCommerce → Settings → Stripe Subscriptions → Customer Experience.
Enable Pause Functionality (default: on)
Lets customers pause an active subscription and choose a resume date. While paused, Stripe does not collect payment for that period. Customers can also resume early from My Account. Turn this off if you do not want self-service pauses.
Enable Cancel on Specific Date (default: off)
When enabled, customers can schedule cancellation for a future date instead of only canceling at the end of the current period. When disabled, the simpler cancel-at-period-end flow is used. Enable this if customers often need to stop on a chosen calendar date.
Allow cancel during trial (default: on)
Lets customers cancel while the subscription is still in a free trial. If disabled, Cancel is hidden during trial and only becomes available after the trial ends. Disable this if you want customers to finish the trial before they can cancel.
Grace period (days) (optional)
Number of days a failed renewal payment can remain in a grace window before the subscription is treated as past due without access messaging. Leave empty or 0 for no grace period display. Use this if you want a short recovery window for failed cards before the customer sees a hard payment-missing state.
Configure these to match your support policy, then save.
Once the product is saved it displays the last sync date, a direct link to the product in Stripe and your products tax info.
Run a test purchase
- Stay in Test Mode.
- Add a synced subscription product to the cart.
- Check out with a Stripe test card (for example
4242 4242 4242 4242). - Verify:
- Order is created and marked paid in WooCommerce
- Subscription appears in Stripe Dashboard → Subscriptions
- Customer can see the subscription under My Account → Subscriptions
For mixed carts (subscription + one-off), confirm both the payment and the resulting Stripe subscription.
Go live checklist
- Environment set to Live Mode
- Live API keys saved and validated
- Live webhook ID present under Orders
- Products re-synced in live mode
- Coupons re-synced in live mode
- Tax and shipping mappings reviewed
- One real or carefully controlled live test complete
Troubleshooting
| Problem | What to check |
|---|---|
| Gateway unavailable | Plugin enabled under Payments; secret key valid for current environment |
| No webhook ID | Save General settings; site must be HTTPS and publicly reachable |
| Sync fails | Frequencies configured; subscription price set; Stripe keys valid |
| Coupon not applied | Coupon synced to Stripe; duration set; product synced |
| Renewal order missing | Create Renewal Orders enabled; webhook receiving invoice.payment_succeeded |
Övriga tjänster
-
Utveckla er e-handel
Vi bygger allt från specialplugins till premium e-handelsplatser
-
Premium hosting
Med modern serverstruktur maxar du din e-handels hastighet
-
Komplexa integrationsflöden
Wetail iPaas aggregerar data och hanterar komplexa integrationer mellan flera olika system